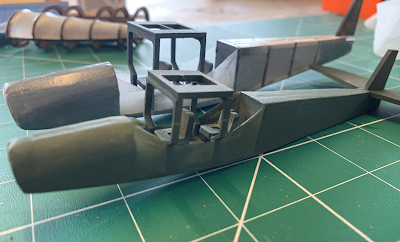
The fuselage of the Vickers Venom was, as far as I can determine, built in two pieces. The front section as detailed in my previous post looks to be of timber construction, with the elliptical framework wrapped in plywood sheet which will no doubt have produced a very strong tubular construction. However, it's clear from photographs that the rear section must have been a fabric covered as the polygonal framework can be determined by the tapering facets along it's length.
My recent experiments with tissue paper covering suggested that this would be quite simple to replicate, subject to constructing a framework with the required shape. What is in effect required is an icosagonic ellipse.
Thank you Google!
I had expected this to be quite tricky, but as it turned out it was very straightforward.
From my drawings I was able to determine the dimensions of a rectangle which would bound the fuselage at each frame position. The CAD software has a tool which will construct an ellipse to be a perfect fit within that rectangle.
I could then find the centre of the rectangle and draw radiating lines at 18 degrees from this centre point, (360/20=18).
By joining the points where the radiating lines met with the ellipse the Icosagon was created. It was then a simple matter to delete the construction lines and be left with the correct form.
This process was repeated for each of the frames, and the profiles created were exported into the 3d CAD, extruded by 2mm and assembled to form the rear fuselage construction.
There are still a couple of elements to refine, but I'm happy with the progress to this point. I think the extra trouble in creating the correct form for the rear of the aircraft will be time well spent. For the record, I have currently invested about 3 hours in this project which doesn't seem at all bad given it's relatively complex shape when compared with the Storch.
As mentioned, I've been experimenting with tissue paper and shrinking dope as a covering technique, with some success. Indeed, this may become my go-to solution for finishing MDF models prior to painting as a means of disguising the awkward joints which often become so painfully obvious once painted.
This picture shows the Mk2 Storch at 1:43 scale and it's little 1:56 brother.
It was a natural choice therefore for the rear fuselage element of the Vernon, and I hoped it would pull tight around the icosagonic frames to reveal the longitudinal 'fold' lines.
Sadly, this idea proved less than successful and the tissue paper tended to shrink a little too much causing it to sink between the frames.
My first thoughts as to a solution is to modify the frames to accept thin wires which will run along the corners to provide a structure for the tissue paper to form around. Whether or not this will be successful we will have to wait and see. If any blog visitors have a suggestion, please let me know and I'll test some alternatives and report my findings.
These two images give an idea as to my current thinking.
I will leave this post with an interesting photograph of the interior of a troop carrier variant of the Vernon. The fold-away deck chairs are themselves interesting pieces, and I'll try to incorporate them into the model.
*** STOP PRESS! ***
At the point of posting I have just come across some more photographs which confirm much of what I have done, but also suggest some improvements. So for the sake of providing a fulsome account of the build of this most interesting aircraft, will post this for now and continue the narrative with the corrections next time. Stay tuned!
Thank you for visiting,
James


The design stage took me back to my technical drawing days, although it would take a lot longer than on the computer ! LOL
ReplyDeletewith the problem on the tail fuselage use the same process as you did with the nose and fill with balsa wood this will hold the tissue and dope perfectly, rember the old saying " If it's not broke don't fix it ! "
I too studied technical drawing, only to leave college and find the world used CAD. I must admit though, understanding the hand-drawn geometry does help with CAD.
DeleteI will try infilling with balsa, it's a good suggestion, thanks - I wonder if I'll be able to sand the little folds with adequate accuracy however! I'll report back, warts and all. :)
You could try using a muslin, or some other light weight fabric that would have a bit more body than tissue paper, you want the right balance between flexibility and rigidity I guess.
ReplyDeleteBest Iain
I hadn't thought of using muslin, might give a nice scale texture too.
DeleteI'll try it and let you know the results. Thank you for the suggestion.
Excellent work, James. The tail assembly looks tricky to my eye with that box kite plan. One trick which may work for the tissue paper skin is to use Pledge/Future floor polish instead of dope. I find it gives the tissue a virtual plastic consistency without much in the way of shrinkage.
ReplyDeleteThank you AJ, I've been enjoying this one! I've never hear of using polish before instead of dope - I'll give it a try!
DeleteI can't imagine what you have come up with now? Looking forward to the warts and all follow up post!
ReplyDeleteComing along nicely I‘d say! Even if the tissue paper didn’t work out as expected I still think you‘re on the right track.
ReplyDeleteThank you very much. I feel like I'm getting there!
Delete