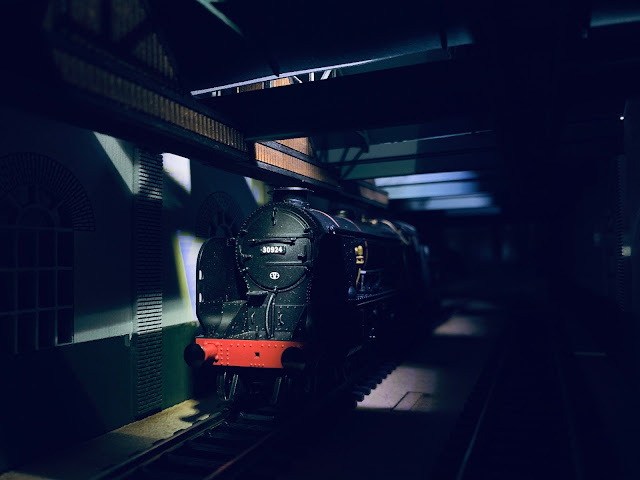
A photograph taken inside my model in which School Class 30924 HAILEYBURY is at rest.
The seaside town I live in Bexhill once had a very grand railway station and associated yard with sheds which stood as the terminus to the now disused Crowhurst to Bexhill branch line. I should add that Bexhill still has a station which preceded Bexhill West, but that is on another line.
Quite why the new line was originally built is nowadays a mystery, as clearly there wasn't enough traffic to justify it being built. Yet I find it intriguing, as the ambition of those who built it was tremendous. Not only did the 3 1/2 mile line require the construction of an impressive 17 arch 460 yard long viaduct, but the station buildings and infrastructure were all beautifully designed and used impressive materials. Clearly those promoting the line were hoping to capitalise upon the development of Bexhill as a seaside resort and they wanted their architecture and engineering to impress.
There were just three stations on the line, Crowhurst, Sidley and the terminus, which was originally called Bexhill-on-Sea. This name changed over time, until the name Bexhill West was settled upon.
As a side project over the past few months I have been modelling some of the structures in 3D CAD and plan to build some of them as photographic dioramas. The end goal being to to recreate some period photos in an effort to improve both my modelling and photographic skills.
My intention was to keep all of this under wraps until I had something worthwhile to show. However the internet has proved to be such a good tool for connecting with like-minded others that I though I'd share some of my progress to date..
The engine shed
This structure still exists today, although it is now used as a warehouse and has had a replacement roof added.
And here's my recreation, albeit incomplete.
There is still much to do to the model. I am yet to complete the roof structure and have to add rainwater down pipes etc. However, the basic structure is done and ready for the finer detailing.
The inside will be modeled too, complete with the chimneys and funnel system which collect the smoke from the engines. I have copied the structural components as closely as possible, the channel sections which form the gutters to the roof valleys will discharge through the down pipes mentioned above.
The picture at the top of the post, although taken in haste, is a flavor of of the kind of photography I have in mind when this project is complete.
The Signal Box
There were two signal boxes at Bexhill West, one of which was so grand it would have looked at home at a London terminus. However the one which caught my immediate attention was its smaller, rather oddly shaped companion.
Box no. 2 sat between two platforms and the signalman perched above and between the arriving and departing trains.
Another cruel close-up! This time of the rear of the cabin. And the real reason for this post.
You see, I have no photographs of this signal box take from this angle, and as such I cannot be sure of what it should look like. I have assumed the locations of these doors, and am guessing that the cabin was accessed via steps from the outside. However it could be the case that the cabin was accessed via stairs inside. I just don't know.
By posting this on the WWW there is a chance (albeit slight) that someone with a camera in the 1950's, with a similar fascination, might just be searching-up 'Bexhill West No 2 Signal Box'.
If you are that person, I'd really appreciate an email! You can contact me on makeitminiature [at] outlook.com
The station canopy
I am very interested in architecture, and the latticework of the station canopy impressed me with its elegance. The feeling of light and space being so well captured in this period postcard scene. Oh, if only all structures could be built so beautifully today.
Until next time, stay safe everyone,
James
The picture at the top of the post, although taken in haste, is a flavor of of the kind of photography I have in mind when this project is complete.
The Signal Box
There were two signal boxes at Bexhill West, one of which was so grand it would have looked at home at a London terminus. However the one which caught my immediate attention was its smaller, rather oddly shaped companion.
Box no. 2 sat between two platforms and the signalman perched above and between the arriving and departing trains.
This is my recreation of the signal box. At this stage it is just a mock-up, as a test of the accuracy of the laser cut CAD files. Once I had cut the pieces I used it as a test piece for painting the brick detail before starting on the engine shed above. However, as a test piece it has worked well and I have learned just how fragile the delicate brick pieces are. You will be able to see where some have broken away. The brick courses are just 1mm high.
Zoomed-in, one ought to be able to see the rebated window openings to the cabin. The final version will have etched brass frames fitted into these recesses.
You see, I have no photographs of this signal box take from this angle, and as such I cannot be sure of what it should look like. I have assumed the locations of these doors, and am guessing that the cabin was accessed via steps from the outside. However it could be the case that the cabin was accessed via stairs inside. I just don't know.
By posting this on the WWW there is a chance (albeit slight) that someone with a camera in the 1950's, with a similar fascination, might just be searching-up 'Bexhill West No 2 Signal Box'.
If you are that person, I'd really appreciate an email! You can contact me on makeitminiature [at] outlook.com
The station canopy
I am very interested in architecture, and the latticework of the station canopy impressed me with its elegance. The feeling of light and space being so well captured in this period postcard scene. Oh, if only all structures could be built so beautifully today.
I began, as usual with a Solidworks model of a section of the canopy, my intention being to use etched brass for the ironwork.
As a test, I laser cut the components for the ironwork from 1mm MDF, and was able to use the sheet metal function in Solidworks to develop the pattern for the glazing frames, shown here test cut in card.
Finally, a sneak peek at one of the gable walls for the station building itself. Like the engine shed, this building still exists. A benefit of the recent lock down is that it has given me the time to 'exercise' past it and count the bricks!!
Until next time, stay safe everyone,
James


